Pages

Saturday, October 30, 2010

Secret Candlemat Swap

Shhhhh... it's a secret.

I'm participating in a Candlemat swap. Lately I've only been doing private swaps, but this public swap has been fun. My partner asked for a candlemat made in earth tones. I loved these colors and ended up making two, one for her and one for me.


This picture of the back shows the machine quilting a little better.


For more GREAT pics of other candle mat 'finishes' check out these links:

A Legacy of Stitches

Anamarpatch

Sewing the Stress Away

Pinned Down

Well, there are so many, here is the Flickr group

Cheers,


Dionne

Wednesday, October 27, 2010

Death by Quilting Reprise - or Help How should I quilt it?

Some of you may remember last year (or there abouts) when I participated in Pat Sloan's Quilting game called Death by Quilting.


It was great fun - I made a very silly video about the whole thing. Best yet, I actually won the game. And it had nothing to do with my video, or actually anything in my control.


My winnings were pretty awesome, a wonderful bundle of Pat's fabrics (those fabrics are long gone, used in one of my favorite projects), several other goodies - including a queen of quilting crown, and a quilt top created by one of the other contestants.


Here is the top I won:


Those feet belong to my little guy.


I finished most of the quilting already. I machine quilted the top, but stopped because I didn't know what I should do with the "cottage corner"....


Any ideas?


Here is the picture I cropped. I thought it was kinda funny because my family was watching tv in the background and it looks like the guy on tv is looking at my quilting, held up by my young daughter.


Cheers,


Dionne

Monday, October 25, 2010

Double Cross Block, Accuquilt Month #1

Double Cross Block


Cutting Directions:

3" finished half square triangles


  • White fabric - cut 14


  • Green fabric - cut 4


  • Blue fabric - cut 6


6 1/2" triangles


  • Orange fabric - cut 2


  • Cutting System Directions:
    GO! dies used: 55009 (cuts 4 - 3" finished triangles), 55001 (cuts 2 - 6 1/2" triangles)

    Studio dies used: 50163 (cuts 6 - 3" finished triangles), 50033 (cuts 4 - 6 1/2" triangles)


    When using the Studio cutting system:


      Orange - layout one layer of orange on the 6 1/2" triangle die, this will result in two extra triangles, you will have the opportunity to use these in later months. Or you can cover half the die and only cut two triangles.


      3" Finished triangles - layer the fabrics on the die in this order:


      • blue, right side up


      • white, right side down


      • green, right side up


      • white, right side down


      • white, either side up

      Now you will need to pay attention to how you remove cut shapes from the die. Gently pull off the top layer of white triangles and set those aside.


      Next, gently lift the next two layers together. You will have white/green right sides together ready to sew. You only need four white/green "couples" so set two white triangles aside and two green triangles aside. You will use them in future months.


      Finally, lift the blue/white "couples" You have six cu,t right sides together, ready to sew.


    Note: If anyone wants these cutting directions for the GO! system, just let me know. They are only slightly different.


Sewing Directions:


  1. Sew 6 white and blue half square triangles right sides together. Press towards the blue.


  2. Sew 4 white and green half square triangles, press towards the green.


  3. Layout 2 white/blue and 2 white/green half square triangles as shown.


  4. Sew together in a 4-patch. Press seams open. Make two.


  5. Sew 2 white half square triangles to sides of one white/blue half square triangle as shown. Press seams toward white added triangles. Make two.


  6. Sew 1 orange triangle to combined triangle unit from previous previous step.


  7. Sew 1 blue/green block to 1 orange/blue block as shown. Press towards the orange. make two.


  8. Sew rows together to complete block. Press seam open.


Cheers,


Dionne

Wednesday, October 20, 2010

My Garden Path Quilt

So I finished this quilt sometime back which I called Garden Path, not sure why that name really.


In one of my Block swaps I made this block from my same Garden Path pattern but with subtle christmas prints. Also I only used two fabrics instead of three. Should we call it Winter path?


Cheers,


Dionne

Sunday, October 10, 2010

Greenpiece, Month Five

This month you only need three colors: Background color, Burgundy and Sage Green.


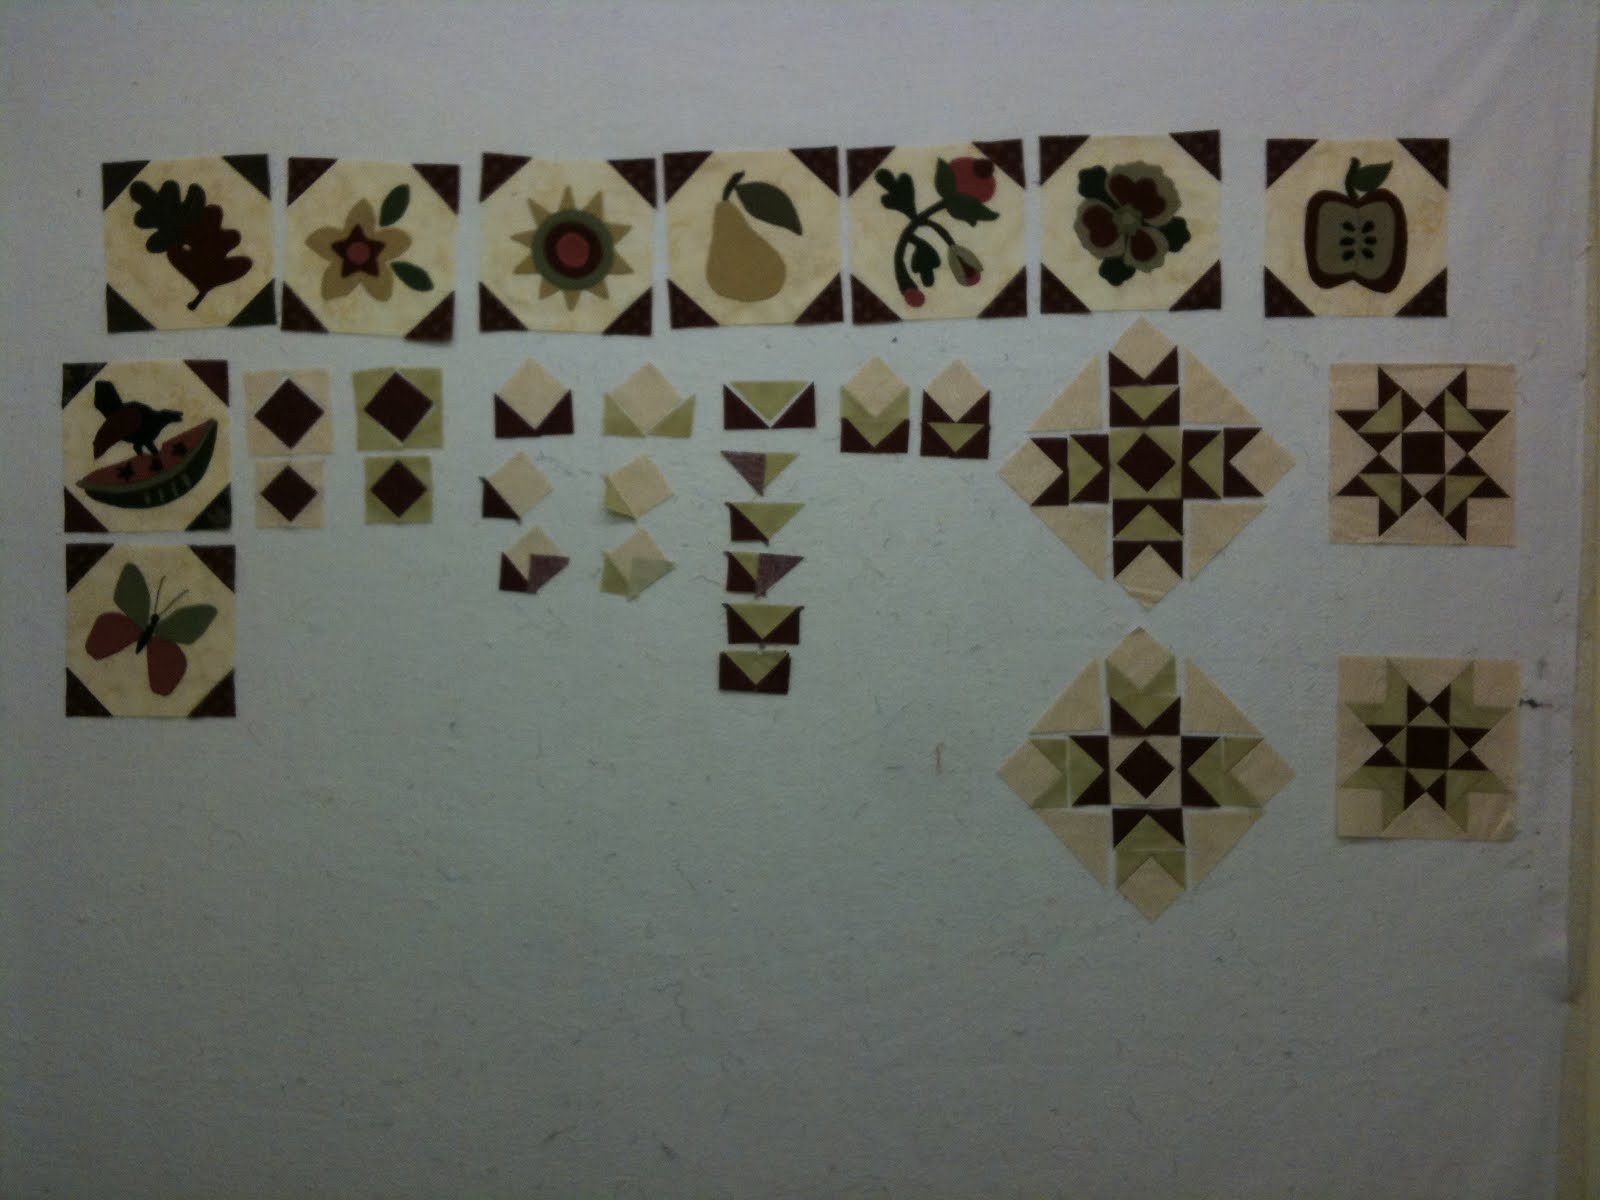
The first picture shows the optional applique blocks you can make each month along with your blocks. Applique can either be wool or cotton. My final quilt won't have any applique at all except for the tree in the center block.


Cutting:
Background Color - 8, 2 1/2" sqrs for corners
2, 2 1/4" sqrs cut once diagonally
2, 5 1/4" sqrs cut twice diagonally

Burgundy - 12, 2 1/4" sqrs cut once diagonally
2, 2 1/2" sqrs for centers

Sage Green - 4, 2 7/8" sqrs cut once diagonally
6, 2 1/4" sqrs cut once diagonally

Piecing:
1 - Center Units: sew the small green and small background triangles to the center squares.
When you sew, be sure you match the long side of the triangle to the edge of the block. Pinch fold the centers to make sure you have them aligned well. You should have 1 Burgundy/Sage Center Unit and 1 Burgundy/Background Center Unit.


2 - Corner Units: sew small burgundy and small sage triangles onto the cornerstone background squares (2 1/2" background squares). Sew the long side of the triangle to two corner edges of the triangle. (see example in 1st picture). Be sure to center your triangles well on the side of the squares or you won't have a nice even quarter inch seam (see example in 2nd picture) You should have 4 Corner Units with burgundy and 4 Corner Units with sage.

3 - Inner Units: Sew the long side of the small triangles to the short sides of the large sage triangles. You should have 8 Inner Units.

Assemble Blocks:
1 - Join Corner Units and Inner Units. You should have 4 Unit A with double bugundy flying geese and 4 Unit A with a sage chevron.

2 - Sew large background triangles to the opposite sides of Unit A. Make 4, two for each block - pairing the different colorways together.

3 - Add remaining 4 of Unit A to opposite sides of center squares. Pair the sage chevron colorway with the center block with burgundy/background Center Unit and the double bugundy flying geese with the burgundy/sage Center Unit. You should have two Units.

4 - Assemble the rows on point. Makes two 8 1/2" x 8 1/2" blocks.


Cheers,

Dionne